In-Depth
Top Tips for Migrating Your Applications to the Azure Cloud
From architecture to security to database compatibility, here's what you need to know to make your cloud migration a success.
One of our favorite aspects of technology is that it is constantly
evolving and continually changing—there's always more to learn! As
students and followers of cloud computing, we're tremendously excited
about the Windows Azure. As technical evangelists for Microsoft, we have
the great fortune to work with customers in the adoption of new
technology. As a result, we've seen a host of different ways in which to
apply Windows Azure.
Early on, George had a personal reason for wanting to use Windows
Azure. George is involved in many community activities, and the ability to
quickly spin up temporary applications and spin them down when no longer
needed proved tremendously useful. For developers with experience writing
Microsoft .NET Framework code, there's hardly any learning curve—build
your application, deploy it and run it.
Because of the interest many of our corporate customers expressed
in Windows Azure, we decided to hold a set of Windows Azure Migration Labs
at the Microsoft Technology Centers. The intent was for customers to bring
their applications into the lab and actually migrate them to Windows
Azure. Through this process, every single customer was able to
successfully migrate its Web applications and SQL databases to the Windows
Azure.
We weren't surprised—we already had plenty of experience with Windows
Azure and were confident our customers would meet with success. But in the
course of helping the lab attendees migrate their various applications, we
learned quite a few tricks that help migrations go smoothly. In this
article, we'll share some of those tips and tricks we discovered working
with customers on real-world migrations.
Migration Basics
When deciding to migrate an application from on-premises to the cloud
(or to create a new application on a cloud service), there are several
aspects of the application architecture that need to be considered:
- Application management
- Application security
- Application compatibility
- Database compatibility
The questions and concerns we heard most frequently during the
migration labs tended to revolve around these four areas. As a result,
we'll focus our discussion around these topics.
One misconception we often encountered was the idea that, by using
Windows Azure, developers don't have to worry about common architectural
patterns regarding issues such as availability, scalability, reliability
and security when moving to or creating applications in the cloud. The
truth is that architectural patterns in the context of distributed
computing are equally valid for applications architected for on-premises
deployment or Windows Azure deployment.
Application Management
No matter whether your application is running on-premises or in the
cloud, the operations management team needs data that will enable them to
make effective decisions. The issues you'll need to consider include
service-level agreements, capacity planning, customer billing, auditing,
application monitoring, traffic analysis and managing costs (knowing when
to scale up or down). These need to be resolved before the application is
deployed to production—and for best results, often before the
application is created.
These were just some of the issues that were considered during the
Windows Azure Migration Labs. By utilizing the Windows Azure Diagnostics
API provided in the Windows Azure SDK
(Microsoft.WindowsAzure.Diagnostics), customers were able to expose
application crash dumps, failed request tracing, Windows event logs, IIS
logs, Windows Azure logs and performance counters.
This is much more straightforward than you might expect. You tell the
diagnostic monitor which types of diagnostic information to collect (see
Listing 1 for an example) and set the data transfer
schedule for the information to be transferred to a central Windows Azure
storage location.
For more information about Windows Azure diagnostics, see the article
"Cloud
Diagnostics: Take Control of Logging and Tracing in Windows Azure" by
Mike Kelley, in the June 2010 issue of MSDN Magazine.
Application Security
A top concern of any organization moving to the cloud is security. Most
companies have invested a substantial amount of time, money and
engineering into designing and developing a security model and it's
important that they're able to leverage existing investments such as
identity stores, single sign-on solutions and firewalls.
While there are many ways for a company to go about securing
cloud-based applications, an increasingly popular pattern is a
claims-based approach.
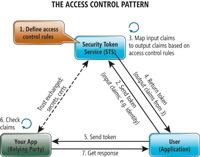
This process is shown in Figure 1. In order for an
application to be able to process security tokens from a Security Token
Service (STS), a trust relationship must be established between the STS
and the application.

[Click on image for larger view.] |
| Figure 1. Claims-Based Identity in an Application Context |
The access control rules (step 1) are defined to meet business
requirements (who can log into the application). These rules are stored
with the STS. When a user tries to access the application, she's
redirected to the STS so she can receive a valid token (step 2). The user
provides a set of input claims (for example, a Live ID or a domain
account) to the STS for authentication purposes. The STS will map these
claims to a set of output claims once the user is authenticated (step 3).
In step 4, the output claims are packaged into a Security Assertions
Markup Language (SAML) token, signed by the STS, and returned to the user
for forwarding to the application (the relying partner in step 5). The
application confirms that the SAML token is valid and from the trusted STS
(step 6). Once the token is validated, the application checks the claims
in the token and sends back the appropriate response (step 7). Pretty
simple! The beauty of this approach is that it fits in extremely well
within the ASP.NET provider model. The process of making your ASP.NET
application claims-aware is really quite simple.
In order to make life easier for the developer, Microsoft introduced
the Windows Identity Foundation (WIF) SDK. This does all of the grunt work
of parsing SAML 2.0 tokens, letting the developer concentrate on his
application without having to worry about the underlying security
technology.
The first thing to do is download
WIF and the WIF
SDK. Once these are installed, you'll have what you need to make your
application claims-aware.
In the Visual Studio solution with your ASP.NET Web application,
right-click and select Add | Add New Web Site. Select the ASP.NET Security
Token Service Web Site template. This will allow you to set up an STS for
your development environment.
Once you have your STS created, you can add a reference to the STS by
right-clicking on your application and clicking "Add STS reference." This
starts a wizard that walks you through the process of establishing a
relationship between your application and the STS. Point to the
application's web.config file for your site and specify the Application
URI (see Figure 2).

[Click on image for larger view.] |
| Figure 2. Starting the Federation Utility Wizard |
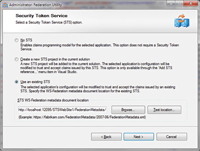
In the next step, choose "Use an existing STS" and then specify the
location of the FederationMetadata.xml file in the STS project (see
Figure 3). Choose the defaults for the remainder of the
process.

[Click on image for larger view.] |
| Figure 3. Configuring the STS |
Take a look at your web.config file. You'll see that the
FedUtil.exe wizard changed a substantial amount of code. The most
important changes were made to the microsoft.identityModel node of the
web.config file. Here you'll see references to your STS project, along
with the claim types expected by the application. To ensure that your
application is appropriately receiving the claims back from your STS, put
the following code in your default.aspx page (note that you'll have to add
a reference to the Microsoft.IdentityModel from the WIF SDK):
IClaimsIdentity ici =

  (IClaimsIdentity)Thread.CurrentPrincipal.Identity;


foreach (Claim c in ici.Claims) {

  Response.Write(c.ClaimType + " - " + c.Value + "<br/>");

}
When you next run your application, you will be automatically
redirected to your STS. By default, the STS allows you to authenticate as
"Adam Carter." Just click the Login button (you don't need a
password).
After the STS authenticates the login, you will be redirected back to
your Web application, along with a SAML token needed for authentication.
Your application will accept the token and allow the default.aspx page to
run. Because the WIF modules intercept your security credentials, you're
able to cast the identity principal as an IClaimsIdentity, and,
consequently, you can extract the claims type and value out of the
identity object (see Figure 4).

[Click on image for larger view.] |
| Figure 4. The Claims Type and Value of an Identity
Object |
Now that the Web application is claims-aware, it's easy to adapt it to
your existing identity model. Simply update your configuration file so
that it points to your production STS and ensure that you've configured
your application as a relying party. Additionally, you can use this
information to create a custom role provider so that you can translate
claims types into roles.
This is an extremely powerful technique, and will let you move your
applications to almost any environment—on-premises, the cloud or even a
partner datacenter—and still validate against your identity stores through
a publicly exposed STS.
Application Compatibility
Windows Azure is an application platform, so it's important to
understand the types of applications suited to the Windows Azure. While
you have the ability to run native code and you can run applications with
full trust, you must package your application before deploying it to the
cloud, which means it's important to evaluate your application to see if
it's a good fit.
Here's an example. One of our customers at the Windows Azure Migration
Labs had an existing application consisting of a SQL Server 2005 back end,
a LINQ to SQL data-access layer and a front end using both MVC Framework
1.0 and ASP.NET 3.5 SP1 running on IIS.
The application sat in a Web farm with a load balancer routing the
traffic. The application itself was stateless so it didn't matter to which
server the user was ultimately directed.
An interesting detail about this application was that the MVC
application manages more than 220 separate Web sites. The company used a
combination of MVC routing and information stored in the SQL Server
database to determine which content should be loaded for each Web site.
There were five Web servers behind the load balancer serving more than 4
million page visits per month for the collection of Web sites.
The primary challenge the company faced was the length of time it took
to provision a new Web server for its environment: months! When the
company considered migrating the application to Windows Azure, its primary
motivation was saving a tremendous amount of time. Scaling out would
become a configuration detail rather than a quarter-long nightmare.